
Lab 4: Git
FAQ
Each assignment will have an FAQ linked at the top. You can also access it by adding “/faq” to the end of the URL. The FAQ for Lab 4 is located here.
Introduction
Up until this point, we’ve been using Git and Github to submit assignments, but haven’t talked much beyond what is needed. In this lab assignment, we’ll revisit some previous git commands that we’ve shown as well as introduce new ones, so that you’ll gain more familiarity with Git (and Github). There will be exercises throughout this lab to help reinforce your understanding of Git.
Please don’t skip around in this lab and do not run commands you find online if you get stuck (this could lead to potential issues in the lab). When going through this lab, read through the commands and instructions and make sure you understand them!
This lab is not graded and there is nothing to submit. Each exercise below ends with a click-to-reveal answer so you can check your own work. Try each one before you peek — the point is the practice, not the answer.
Git vs Github
Before we explore the Git commands, let’s talk about the difference between Git and Github.
Git
Git is a version control system that is free and open-source (this means that the source code is available for use by users and developers). As a version control system, we use Git to help manage different versions of code and track changes made in the source code. This makes it even more useful if there are multiple developers working on one program. Without a version control system, there wouldn’t be much communication between developers and changes to the source code will go unknown to other developers.
For the most part, Git’s data model or representation is based on a linked list. We’ll talk more about this a little later, but whenever we want to save a snapshot of our repository, we commit it (like we’ve been doing up until this point when we want to submit an assignment). These commits are, in a way, chained together. Here’s a visualization of what that looks like below:
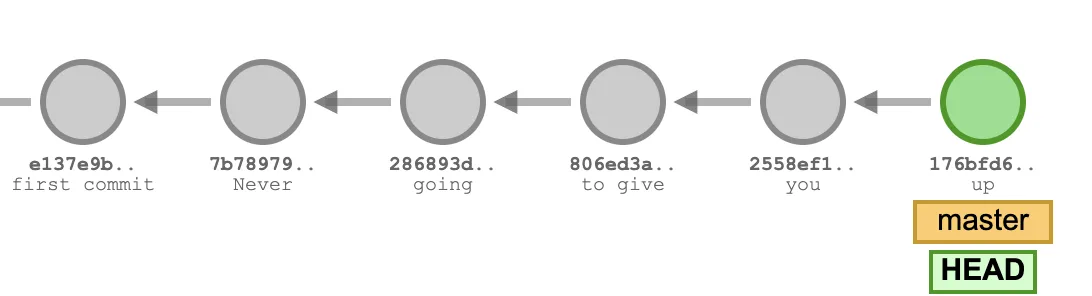
This linked list of commits forms a history of the changes you’ve made. The most recent commit/latest snapshot is the green circle above.
Github
Github is an online hosting service for git repositories. Git repositories are central locations
where any changes made to our files and directories are tracked and managed (this is your fa26-s***
repository). Repositories can be made locally on your computer as well as on Github.
Github allows for easier collaboration with other developers, as you can more easily share code, and also allows us to save our code on a remote server. If you have some code stored locally, you can save it to Github. You’ll then have a copy of your code saved somewhere else in the event that your local code is somehow destroyed. This is why we say to commit often so you save your work and progress on assignments!
Git Commands
In this section, we describe some of the more common Git commands you might end up using. Please keep in mind that this is not comprehensive of all the Git commands that may be available. Let’s begin!
init
The following command can be run in a directory that you want to make into a Git repository:
git init
This initializes a git repository in that directory.
add, commit
When we want to save the changes we’ve made in a git repository, we want to first select what changes should be saved:
git add some_file.txt
If you want to select all changes that have been made, you can run the following shortcut:
git add .
The changes we’ve selected have not actually been saved yet. When we add certain files/changes, this
means we’ve put them into a staging area, which stores information about what will go into our next commit.
To actually save our changes, or take a snapshot of our current repository, we run git commit -m, like below:
git commit -m "We put a commit message here to describe what changes we made."
When we commit any changes, it’s good practice to place a descriptive commit message - this makes it easier to keep track of what changes are made over time as well as make it easier for other developers to understand what you’ve changed.
status
If you want to see what changes have been made, you can run git status in your repository. It might look
a little bit different from below, but it will show what files have been modified. If they are under
“changes not staged for commit”, it means they haven’t been added to the staging area. Once they are
added, those files will show up under “Changes to be committed”.
On branch main
Your branch is up to date with 'origin/main'.

Changes not staged for commit:
  (use "git add <file>..." to update what will be committed)
  (use "git restore <file>..." to discard changes in working directory)
	modified:   proj1a/src/LinkedListDeque61B.java
	modified:   proj1b/src/ArrayDeque61B.java
	modified:   proj1b/tests/ArrayDeque61BTest.java
In this example, git status shows that we’ve modified three files that have not been staged for commit. Once
we git add them, git status will change:
On branch main
Your branch is up to date with 'origin/main'.

Changes to be committed:
  (use "git restore --staged <file>..." to unstage)
	modified:   proj1a/src/LinkedListDeque61B.java
	modified:   proj1b/src/ArrayDeque61B.java
	modified:   proj1b/tests/ArrayDeque61BTest.java
In both cases, “Changes not staged for commit” and “Changes to be committed” are for files that are already tracked or have been saved before in a previous version of your repository. Git will also show untracked files, which have not been saved in a previous version of your repository.
log
Running git log in a git repository will display all the history of our committed history. For example, you
would get something similar to the below:
$ git log

commit 8g955d88159fc8e4504d7220e33fad34f8f2c6bd
Author: Diego Huezo <huezodiego@Huezos-MacBook-Pro.local>
Date:   Tue Feb 7 19:06:48 2016 -0800

    Added common Git problems to lab04.
What this means is that you’re able to view the entire history of all the commits you made. Remember
the message you always add when you commit? It will show up in git log. In this example, the
commit message would be “Added common Git problems to lab04.” That is to say, we ran
git commit -m "Added common Git problems to lab04." when we committed.
To scroll up and down in git log, you can use the up and down arrow keyboard keys. To exit out of git log, press the keyboard key q.
Another important thing is what is besides the “commit” heading. It looks like a long string of random characters and numbers, but it represents the commit id. The commit id is a unique id that Git assigned to identify the specific changes that were made in the commit. It is important for the next section.
Undoing Changes: restore, reset, and revert
Sooner or later you will need to undo something. Git gives you three different commands for this, and they are not interchangeable — they operate at three different layers. Read this whole section before you use any of them.
The short version:
restorechanges files.resetchanges which commit your branch points at.revertadds a new commit that cancels out an old one.
restore
git restore throws away changes in your working directory and replaces the file with a
version Git already has saved. It only ever touches files — it never creates, deletes, or
modifies a commit.
If you want to discard your uncommitted edits and go back to the version in the most recent
commit, run git restore without specifying a commit id:
git restore [path_to_file]
If you want the version from a specific commit, find that commit’s id with git log and
name it as the source:
git restore --source=[commitID] [path_to_file]
You can also pull a file from a branch on a remote repository (we’ll cover remotes and branches below):
git restore --source=[remote-name]/[branch-name] [file_name]
Finally, if you staged something with git add and want to unstage it without losing your
edits, use --staged:
git restore --staged [path_to_file]
Because restore never touches your commit history, git log looks exactly the same before
and after you run it. This also means restore cannot help you undo something that is
already committed — for that you need one of the next two commands.
reset
git reset moves your current branch to point at a different commit. Every commit after that
point is no longer on your branch.
git reset --hard [commitID]
There are three modes, which differ in what they do to your staged changes and your files:
--softmoves the branch pointer, but leaves your staging area and working directory alone. Your changes are still staged, ready to be committed again.--mixed(the default) moves the pointer and unstages your changes, but leaves the files on disk as they are.--hardmoves the pointer and throws away both the staging area and your working directory changes.
git reset --hard will discard uncommitted work with no confirmation prompt. Be certain you
know what is in your working directory before you run it.
The important thing to understand about reset is that it is positional, not surgical. It
rewinds your branch to a moment in time. If a mistake is five commits back and you have four
good commits after it, resetting to before the mistake takes the four good commits off your
branch too.
reflog: the safety net
Commits that fall off your branch aren’t immediately deleted. Git keeps a local log of every
position HEAD has been in:
git reflog
This prints a list of recent positions with their commit ids. If you reset too far, find the
entry from just before your reset and point your branch back at it with another
git reset --hard [commitID].
If you ever think you have destroyed work with Git, run git reflog before you panic.
Note that it is local to your machine and its entries do expire, so treat it as a safety net,
not a backup.
revert
git revert takes a commit you already made and creates a brand new commit that undoes
its changes:
git revert [commitID]
Git will open an editor with a pre-filled commit message like Revert "...". Save and close
it to finish. If you’d rather not deal with the editor, git revert [commitID] --no-edit
accepts the default message.
Notice what this does not do. The original commit is still in your history — you can still
see it in git log. Nothing after it is disturbed. You have simply added one more commit to
the end of the chain whose content is “the opposite of that one.”
Which one should I use?
| Command | What it changes | Does it change history? | Safe on a shared branch? |
|---|---|---|---|
git restore |
Your working directory (and, with --staged, the staging area) |
No — it never touches commits | Yes |
git reset |
Moves your branch pointer to a different commit | Yes — commits after that point drop off the branch | No |
git revert |
Adds a new commit that undoes an old one | No — it only adds | Yes |
The key distinction: restore and reset remove things, while revert adds
something.
Why revert is what you’ll use in industry
Once a commit has been pushed somewhere other people pull from, your history stops being
yours alone. reset rewrites that history, and rewriting history other people already have
causes real problems:
- It breaks everyone else. Your teammates already have the old commits. When your
rewritten branch doesn’t match theirs, their next
pullturns into a mess of conflicts and duplicated commits. - It requires a force push. Getting a rewritten branch onto the remote means
git push --force, which overwrites whatever is on the server — including any work a teammate pushed in the meantime. Most companies configure their shared branches to reject force pushes outright, soresetsimply isn’t available to you there. - It destroys the audit trail. When something breaks, the first question is “what changed?” A revert commit answers that: the bad change is visible, the undo is visible, and both are dated and attributed. A reset leaves no trace that the change ever existed.
- It doesn’t scale to one commit in the middle. Real branches have many commits from many
people. You almost never want “rewind to Tuesday” — you want “undo Alice’s change from
Tuesday, keep everything else,” which is exactly what
revertdoes.
The rule of thumb: if a commit has been pushed, undo it with revert. If it only exists on
your own machine, reset is fine.
This is also why you’ll hear “rolling back” a deploy described as a revert. A revert is just another commit, so it flows through code review, testing, and deployment like any other change — no special cases, no rewritten history.
Git Exercise (Part 1)
Now you’re ready to start using git! Your next task is to work through a small git workflow by setting up a repository and making a couple commits. At the end, you’ll run a few commands to check that your repository came out the way it should.
This is meant to be done on your local computer, but outside your fa26-s***
repository. Make sure you don’t initialize a repository in your fa26-s***!
If you need help with creating directories, creating files, changing directories, etc., refer back to Using the Terminal.
- Create a directory called
lab04-checkoff. You can put this directory anywhere on your computer (but not in yourfa26-s***repo). - Move into the
lab04-checkoffdirectory, and initialize a git repository. - Create a file called
61b.txtin any way you’d like. In this text file, add the text “Created 61b.txt”. - Create another file called
61boba.txtin any way you’d like. In this text file, add the text “Created 61boba.txt”. - Begin tracking only
61b.txt, and create a new commit containing just this file, with the following commit message:Add 61b.txt. - Make a modification in
61b.txtby changing the text in the file to: “61b.txt changed to version 2”. - Make another commit, this time containing both
61b.txtand61boba.txt. The commit message should be:Updated 61b.txt and added 61boba.txt. -
Make one more modification to
61b.txtby changing the text in the file to: “61b.txt changed to final version”. Don’t commit this version.At this point, if you were to type in
git statusandgit log, you’d see something similar to the following: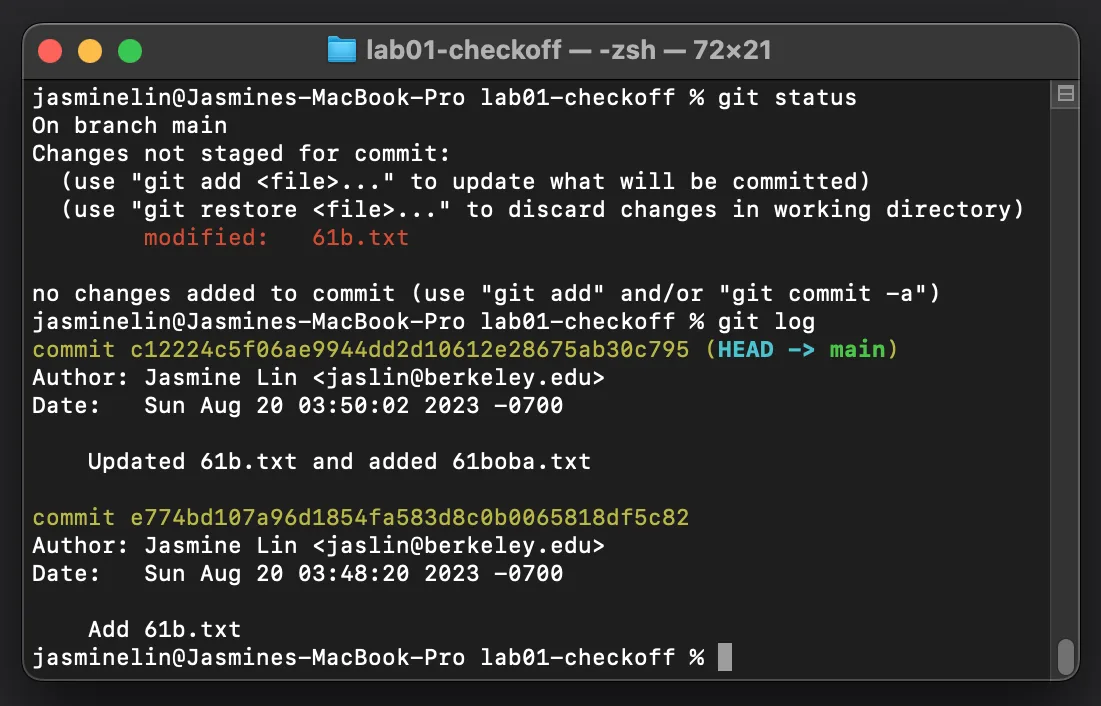
- Using git only, restore
61b.txtto the version in the most recent commit. - Using git only, restore
61b.txtto the version in the first commit.
Checking your work
Your commit ids will be different from anyone else’s — Git generates them from the time you
committed and who you are — but everything else about your repository should match exactly.
Run these four commands from inside lab04-checkoff:
git log --oneline
git show --stat HEAD~1
git ls-tree --name-only HEAD
cat 61b.txt
What you should see (click to reveal)
git log --oneline — exactly two commits, newest first. Only the ids will differ:
446831b Updated 61b.txt and added 61boba.txt
0230186 Add 61b.txt
git show --stat HEAD~1 — this is the check that catches the most common mistake. Step 5
asked you to commit only 61b.txt, so your first commit must touch exactly one file:
Add 61b.txt

 61b.txt | 1 +
 1 file changed, 1 insertion(+)
If you see 61boba.txt listed here, or “2 files changed”, then both files went into the
first commit and step 5 didn’t go as intended.
git ls-tree --name-only HEAD — by the second commit, both files are tracked:
61b.txt
61boba.txt
cat 61b.txt — this one depends on where you stopped. After step 9 (restoring to the
most recent commit):
61b.txt changed to version 2
After step 10 (restoring to the first commit):
Created 61b.txt
If you still see “61b.txt changed to final version”, the restore didn’t take effect — that text was never committed, so no commit should ever give it back to you.
Notice that
git statusstill reports61b.txtas modified after step 10. That’s correct: your working directory now holds the first commit’s version while the latest commit holds something different, so Git sees a difference. Nothing is wrong.
Git Commands Continued
Let’s continue on! In this section, we go a little more in-depth about remote repositories and what branching is.
remote add
Sometimes, we want to be able to pull changes from another repository, specifically one that is hosted on Github. To do so, we can add that repository as a “remote”. For example, in HW01, we used the following command to add the skeleton repository in our personal repository:
git remote add skeleton https://github.com/Berkeley-CS61B/skeleton-fa26.git
Let’s break this down. When we want to add a remote, we specify the name of the remote, as well as the remote URL.
In this example, the name is skeleton and the url is https://github.com/Berkeley-CS61B/skeleton-fa26.git. We can
then refer to the remote repository with its name when we want to pull or push from it.
So, to add a remote, we can run the following command:
git remote add [remote-name] [remote-url]
You can run git remote -v in your repository to check what remotes have been added.
switch
Most version control systems have some kind of branching system. When we say branching, it means that we “diverge” away from the “main” branch. Branches allow us to keep track of multiple versions of our work at the same time (think of it like alternate dimensions). A reason why we would want to create another branch is if we want to develop another feature of our program, but we still wanted to maintain the current version that we had.
Let’s consider a visualization.
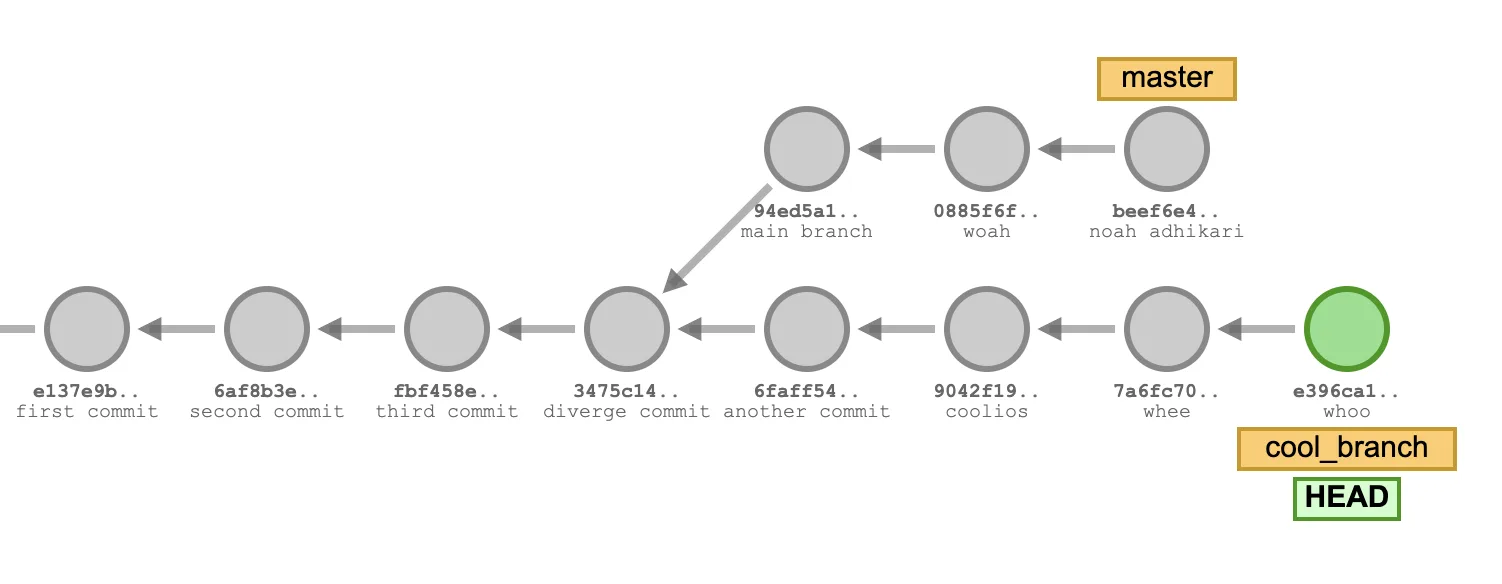
In this image above, there are two branches, master and cool_branch. Notice that we’ve
already made several commits. At some point, we ended up “branching” away from master
(at the commit with the message “diverge commit”) and diverging away from that specific branch.
Now, if we wanted to stop working on our current branch (cool_branch), we can switch back to our
master branch. We do this by running the following command:
git switch [branch-name]
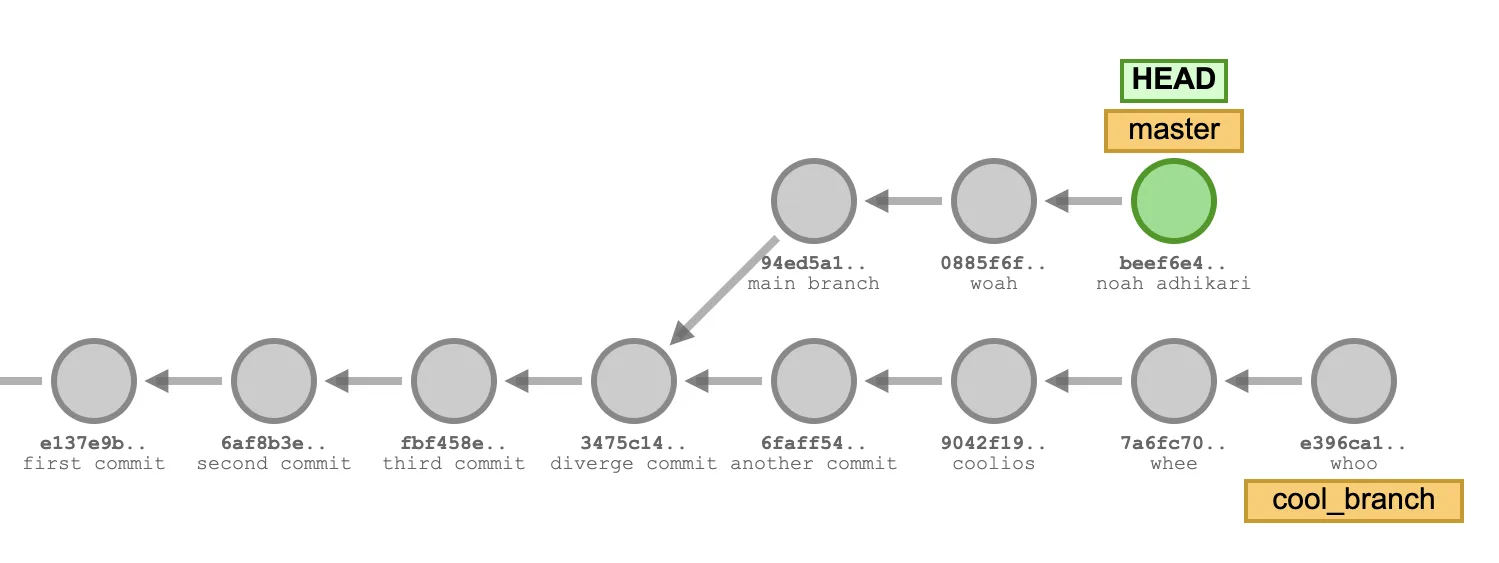
In this example, we would run git switch master. Notice that the HEAD tag is now pointing back to
the latest commit on master.
We won’t cover it here, but feel free to look up how you might create a branch.
If you get an error that the .idea folder is untracked when you try to switch out of a branch, you can create another commit including the .idea folder using git add and git commit. You do not have to push these changes.
push
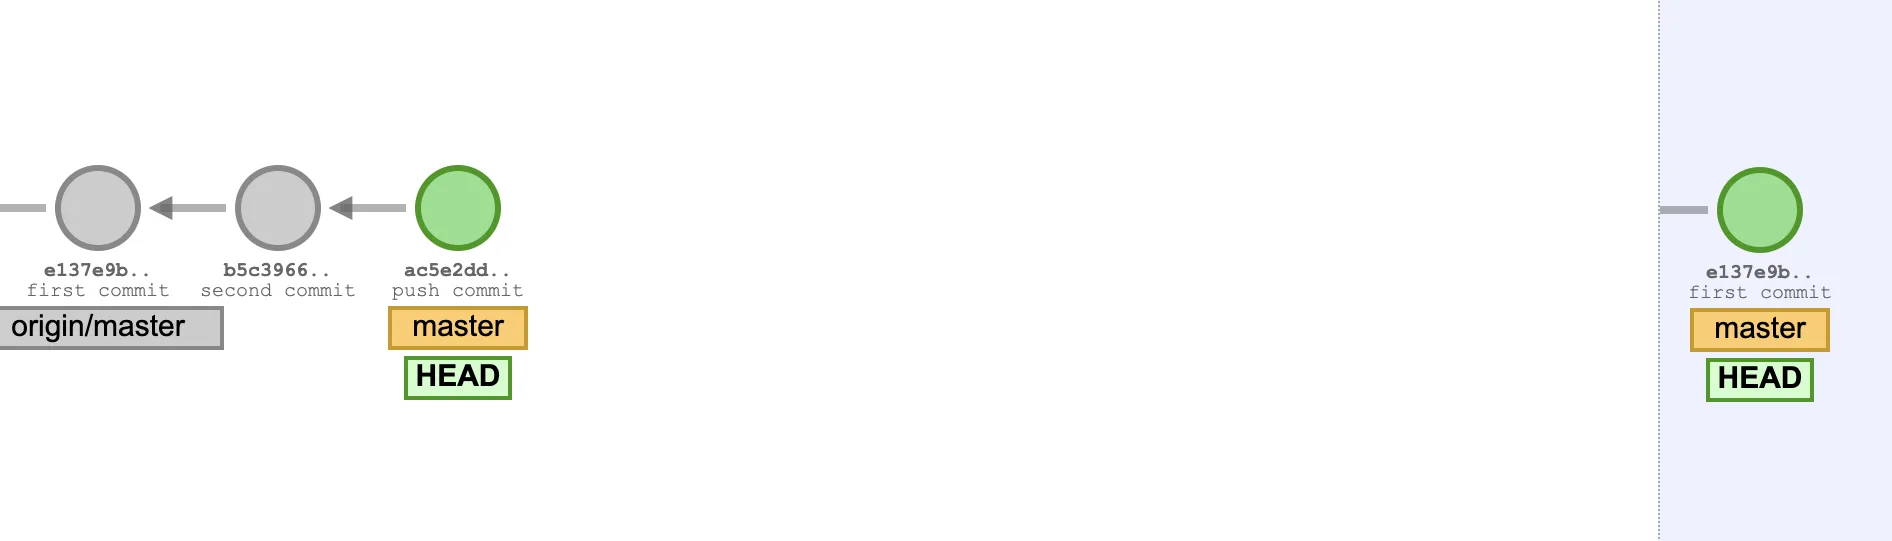
If we want to push any commits we made on our local computer to a remote repository, we can use git push:
git push [remote-name] [branch]
In this class, we use git push origin main to push any of our changes from the local repository
to our remote repository. origin is the remote repo that represents our personal repository that’s hosted
on Github and main is the branch that we work off of.
Here’s a visualization of what this looks like with a couple of local commits we haven’t pushed yet. The local repository is on the left, and the remote one is on the right.
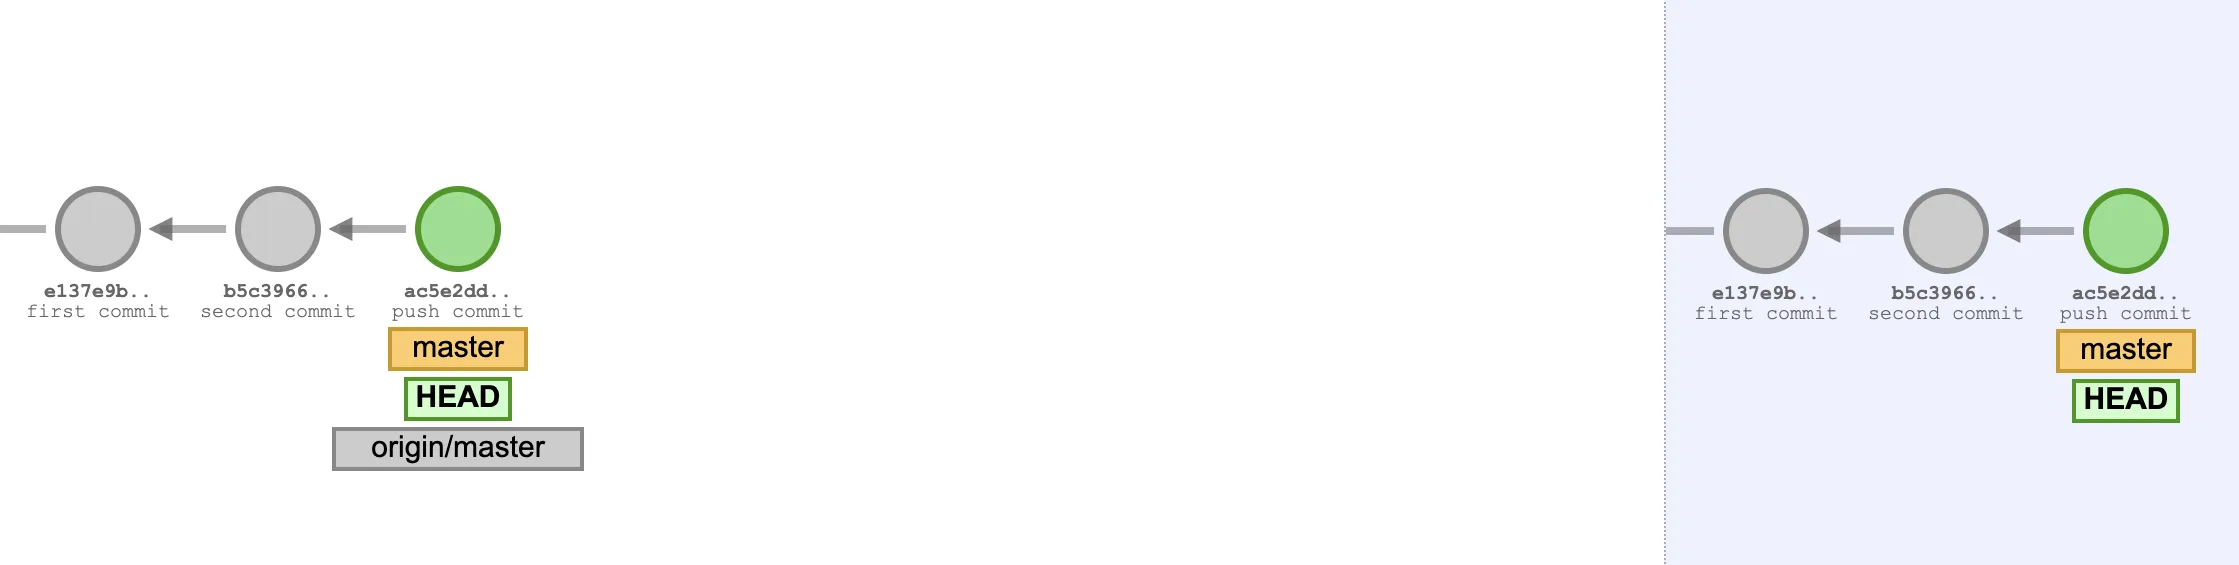
After pushing, our commits are now saved in our remote repository:
pull
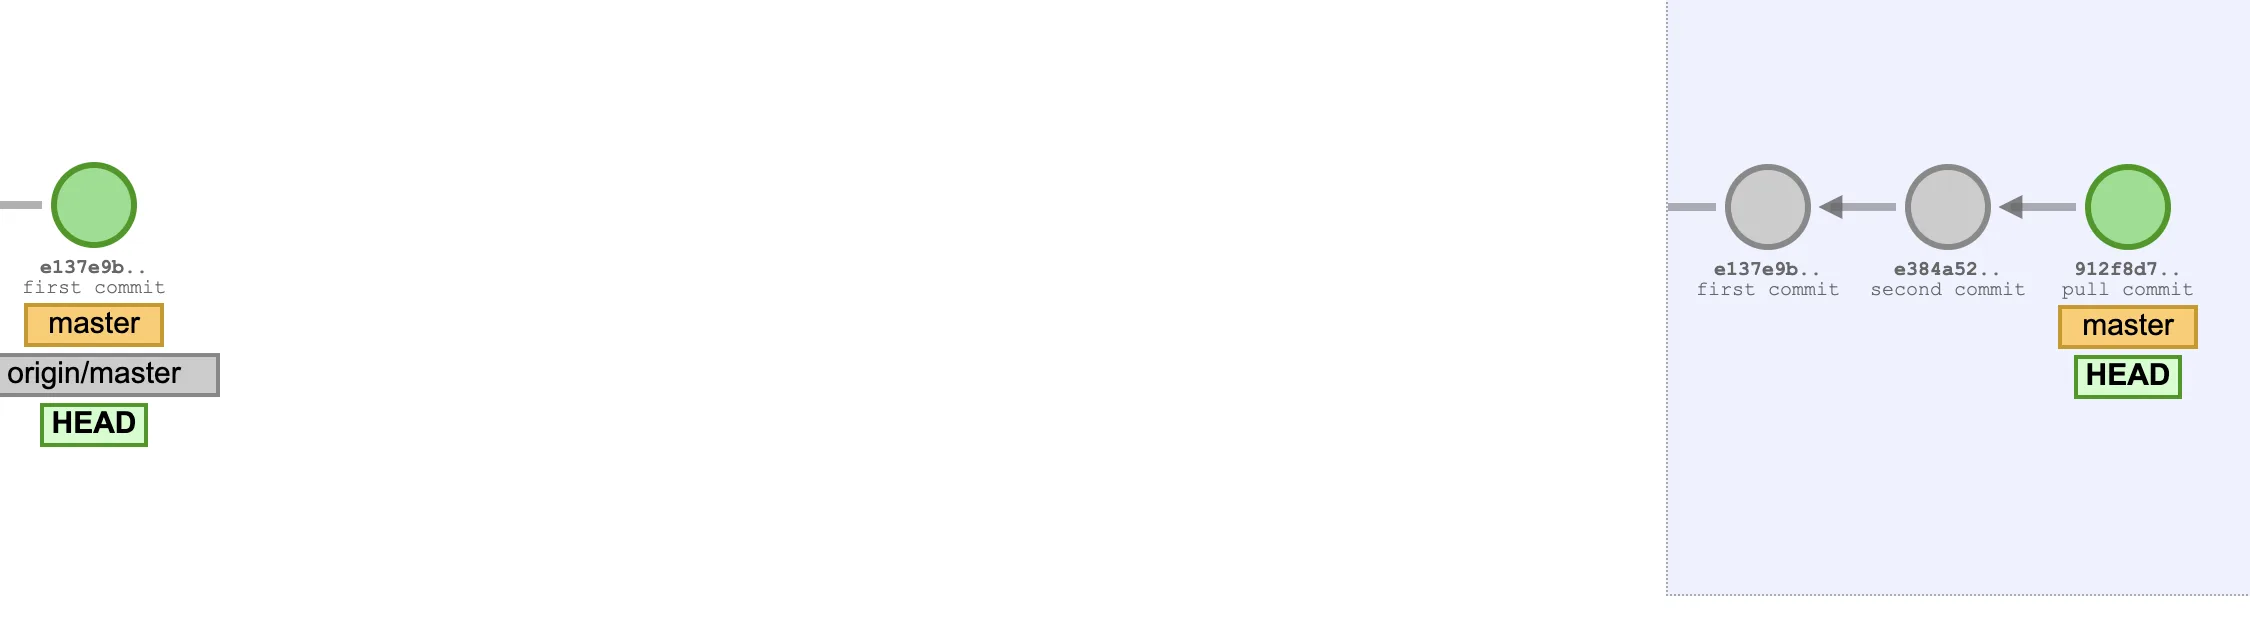
Conversely, if we want to pull any changes from our remote repository to our local one, we can run git pull:
git pull [remote-name] [branch]
We’ve done this before when pulling from the skeleton: git pull skeleton main. Here’s a visualization of
what this looks like with a couple of remote commits we haven’t pulled from yet:
After pulling, our remote commits are now in our local repository:
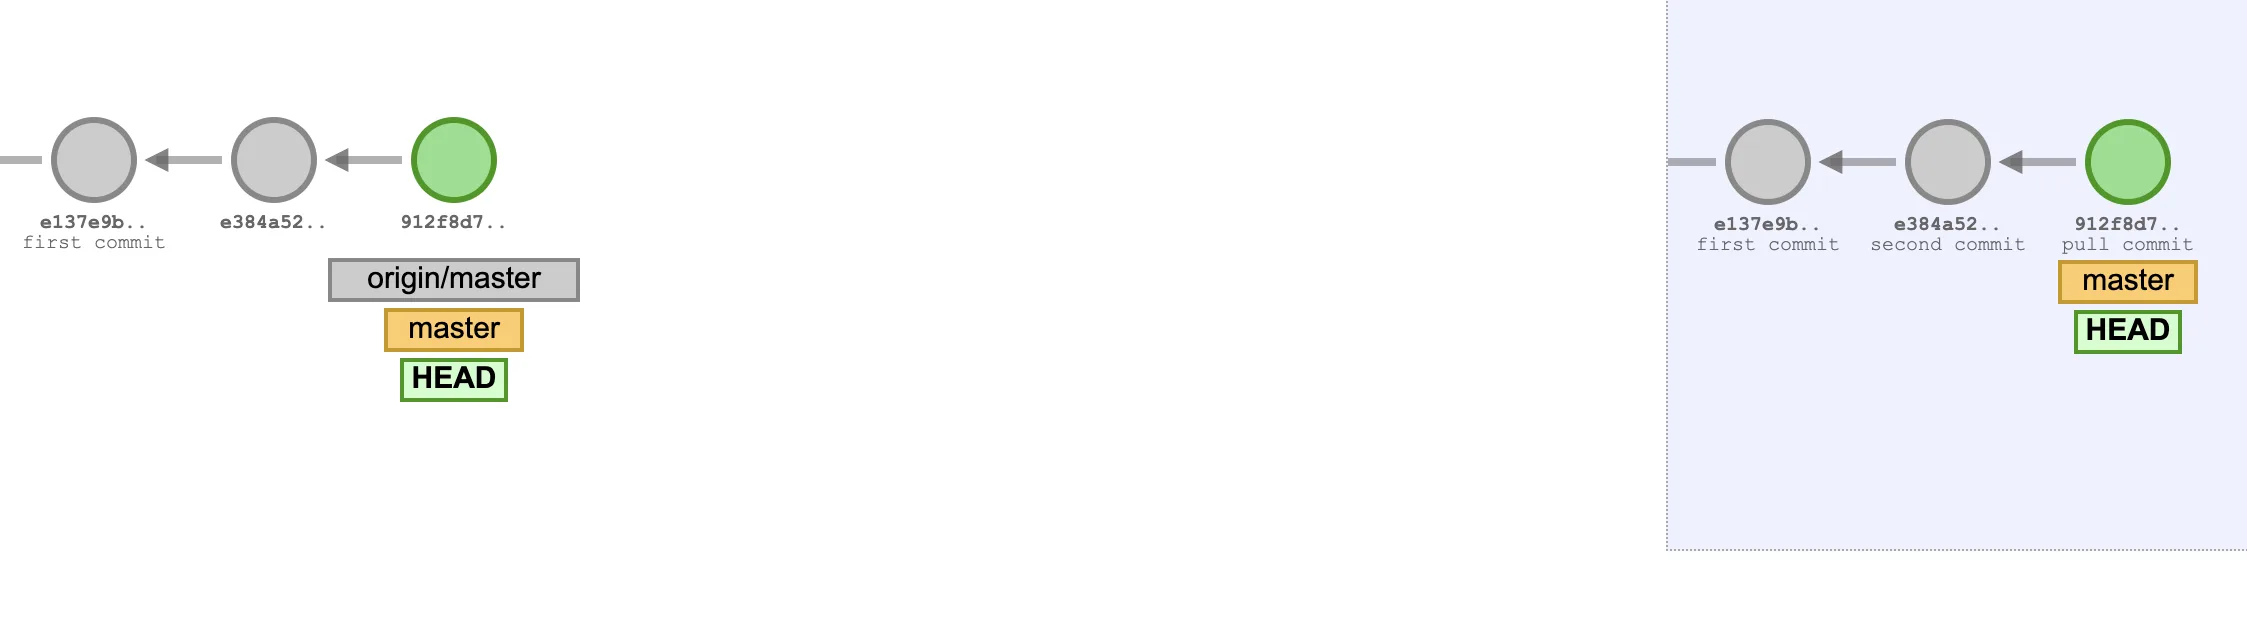
A pull does two things: it fetches the commits from the remote, and then it combines them with the commits you already have. Most of the time that combination happens automatically and you never think about it. When it can’t happen automatically, you get a merge conflict — which is the next section.
Common Git Issues
In this section, we’ll cover some common issues you might see with Git. This is not comprehensive of all issues you may see. You can read more about git issues in our Using Git guide here and Git WTFs here.
While this is meant to help diagnose a Git issue and go through the common ways to resolve them, always ask for help if you aren’t too sure!
Fatal: refusing to merge unrelated histories
This occurs when the history of your local respository and the remote repository are separate. This usually happens when someone has changed files in the skeleton code after you
have pulled. To fix, run git pull <remote-repo> main --allow-unrelated-histories --no-rebase.
This may force a merge conflict (more information below).
Merge Conflict
Merge conflict messages can show up like below:
$ git pull origin main
From github.com:Berkeley-CS61B/course-materials-sp16
 * branch            main     -> FETCH_HEAD
Auto-merging proj/proj0/solution/canonical/Planet.java
CONFLICT (content): Merge conflict in proj/proj0/solution/canonical/Planet.java
Automatic merge failed; fix conflicts and then commit the result.
Merge conflicts occur when different modifications have been made to the same file that impact the same lines of code, and thus, cannot coexist. Git will indicate which files have conflicts; to fix them, open the files in IntelliJ and resolve them manually. These conflicts will appear like below in the file:
    public Planet(Planet p) {
<<<<<<< HEAD
        this.xPos = p.xPos;
        this.yPos = p.yPos;
=======
        this.xxPos = p.xxPos;
        this.yyPos = p.yyPos;
>>>>>>> 27ddd0c71515e5cfc7f58a43bcf0e2144c127aed
Everything between <<<<<<< HEAD and ======= is from your local version. Everything between ======= and
27ddd0c71515e5cfc7f58a43bcf0e2144c127aed is from your remote repository. Between these two options,
choose the modifications that you would like to keep — you may keep one side, the other, or
some combination of both. Once you have resolved all conflicts, delete the three marker
lines, then git add the file to mark it as resolved and git commit to complete the merge.
Run git status to check the state of your repo at any point.
Staging a conflicted file with
git addis how you tell Git you’ve finished with it. If you rungit commitwithout adding it first, Git will refuse and tell you there are still unmerged paths. If you want to back out entirely and return to how things were before the pull, rungit merge --abort.
We’ve provided more reading on merge conflicts here and here.
Your branch is ahead of ‘origin/main’ by X commits.
This occurs when the local repo is no longer in sync with its remote counterpart.
If you want to keep the local versions of your files, use git push.
If you want to overwrite your local changes with the versions in the remote repo,
use git reset --hard origin/main.
Git Exercise (Part 2)
In this exercise, we’ll have you clone a git repository, and you’ll be using some of the commands you’ve learned to find
the passwords that are hidden away in the repository. Copy and paste the following command to clone your repository, outside
your fa26-s*** repository and outside your lab04-checkoff repository that you created in part 1. The exact location is up to you, as long as it’s not in another repository or in one of the repositories we mentioned in the previous sentence.
Before running the command, double check that you are not in your personal repository or the lab04-checkoff repository.
git clone git@github.com:Berkeley-CS61B/git-exercise-fa26.git
Check that a repository called git-exercise-fa26 shows up. If it’s there, cd into it, open up
git-exercise-fa26 in IntelliJ, and you’re ready to continue on with the exercise!
Part 2.1: Undoing a committed mistake
Start by getting your bearings:
git log --oneline
Somewhere in this history, a commit deleted a value out of secret.txt that we need back. Read
the commit messages to work out which one — note that secret.txt is the file you care about
here. There are also commits after that mistake whose work you need to keep.
Trying restore first
Open notes.txt, change a line, and don’t commit. Run git status and git log --oneline,
then undo your edit:
git restore notes.txt
Run git status and git log --oneline again. Your file is back, and git log is completely
unchanged. restore fixed your working directory, but it had no effect at all on the committed
mistake — that commit is still there.
Trying reset
Now find the commit id of the commit just before the bad one, and run:
git reset --hard [commitID]
cat secret.txt
The bad commit is gone. But look at git log --oneline and at secret.txt — every commit that
came after it is gone too, and one of the values you need went with them.
Get back to where you started using git reflog to find your previous position:
git reflog
git reset --hard [commitID]
Confirm with git log --oneline that all the commits are back before moving on.
Doing it properly with revert
Now undo only the bad commit:
git revert [commitID]
Look at the result:
git log --oneline
cat secret.txt
The bad commit is still in your history, with a new commit on top that undoes it. Every commit
after it is untouched. And secret.txt now has both values.
secret.txt contains two values. Join them with a single hyphen, in the order they appear in
the file (so if the file showed apple and orange, you would write apple-orange).
You cannot get this password by using
resetinstead ofrevert— rewinding far enough to recover the first value destroys the commit that added the second one.
Answer (click to reveal)
honey-comb
If you only have honey, you reset instead of reverting and lost the commit that filled in
the second value — use git reflog to get back, then git revert the bad commit instead.
Part 2.2: Branches
The repository you cloned has multiple branches, and the branch called marcus might have
something we want. Switch to that branch and see what’s in there.
Find the password on the marcus branch. You can verify that it is the password by checking the
commit message of the commit that you are on. When you have it, switch back to the main
branch.
Answer (click to reveal)
pollen
Part 2.3: Pulling and resolving a conflict
The last password isn’t in this repository at all — it’s in another one:
git@github.com:Berkeley-CS61B/git-exercise-remote-fa26.git
Add this repository as a remote in your git-exercise-fa26 repository. You may give the
remote a name of your choosing. Then pull from it (without the brackets around the remote’s name):
git pull [remote-name] main --allow-unrelated-histories --no-rebase
We add --allow-unrelated-histories and --no-rebase because these two repositories share no
history, so Git refuses to combine them by default.
Do not add these flags if you aren’t sure they’re needed. If you use them when they aren’t, you
may end up putting yourself into an interactive rebase and destroying some of your work. In
most, if not all cases of pulling from the skeleton in your personal repository, these flags
should not be added, and running git pull skeleton main is enough.
This pull will not complete cleanly. Both repositories contain a config.txt, and they
disagree about the same line, so Git stops and hands the conflict to you. Check what state
you’re in:
git status
Open config.txt in IntelliJ and you’ll see the conflict markers described in the
Merge Conflict section above. Each side holds one half of the password you
need.
Do not resolve this by accepting one side wholesale. IntelliJ offers “Accept Yours” and “Accept Theirs” buttons, and both give you the wrong answer here — each side alone is incomplete. Edit the line by hand.
Replace the entire conflicted block — all three marker lines included — with a single line that keeps both values, joined with a hyphen, your local version’s value first:
[key]=[your value]-[their value]
Then finish the merge:
git add config.txt
git commit
Git pre-fills a merge commit message; save and close the editor to accept it. Note: You may need to either type “:wq” then enter to save and exit, or Ctrl X to save and exit (not CMD X).
The value you wrote into config.txt — both halves and the hyphen, but not the [key]=
part — is the last password.
Answer (click to reveal)
queen-bee
If you have only one half, you accepted one side of the conflict wholesale instead of
combining them. Run git merge --abort to undo the merge, then pull again and edit the line
by hand.
Wrapping Up
There is nothing to submit for this lab. By the end you should have worked through:
- a repository you built yourself, with two commits and a file restored from history (Part 1)
- undoing a committed mistake without throwing away the work that came after it (Part 2.1)
- looking at a different branch (Part 2.2)
- pulling from a remote and resolving the conflict it caused (Part 2.3)
The one to remember for the rest of the semester is the last one. You will hit merge
conflicts pulling from the skeleton, and the fix is always the same: open the file, delete
the markers, keep the code you want, then git add and git commit.
You can keep or delete lab04-checkoff and git-exercise-fa26 — neither
is needed again.
If you want to play around with the visualizer which we used to make some of the images in this lab, you can find it here.