
Lab 10: Shortest Paths & Hashing
Lectures needed for this lab: Lecture 23 (Shortest Paths), or Chapter 22. The bonus part uses Lecture 26 (Hashing I) and Lecture 27 (Hashing II), or Chapters 25 and 26.
FAQ
Each assignment will have an FAQ linked at the top. You can also access it by adding “/faq” to the end of the URL. The FAQ for Lab 10 is located here.
Introduction
In this lab, we’ll pick up where we left off last time with Dijkstra’s algorthim.
If you finish that, there is bonus content on hashing: writing equals and
hashCode for a small class, testing whether a hash code is any good, and
finding the flaw in a hash function that looks fine at first glance. The bonus
part is not required for checkoff.
Goals and Outcomes
By the end of this lab, you will…
- Be able to implement Dijkstra’s algorithm using a priority queue that supports
changePriority. - Be able to read shortest paths and distances off of the
distToandedgeToarrays it builds.
Bonus:
- Get more practice with
equalsusinginstanceof. - Understand why a class that overrides
equalsmust also overridehashCode, and what goes wrong in aHashSetif it doesn’t. - Be able to tell a good
hashCodefrom a bad one, both by writing a test and by looking at a picture. - Have seen how integer overflow can quietly ruin a hash function.
Setup
Follow the Assignment Workflow Guide to get started with this assignment. This starter code is in the lab10 folder. NOTE as with previous labs you do not need to submit this assignment. Instead, you will get credit by completing a checkoff with your TA during lab.
The graph code is a copy of Lab 9’s, renamed, so that this lab stands on its own:
| Folder | What’s in it |
|---|---|
lab10lib |
Lab10Graph and ExtrinsicMinPQ, the two data structures you’ll build on. No need to open or modify these files. |
lab10main |
Main, which builds an example graph and opens the visualizer. The other file in this package is the visualizer’s internals, and you don’t need to open it. |
lab10algorithms |
Lab10Dijkstras. This is where you write code. Lab10DFS and Lab10BFS are provided already solved, since the visualizer uses them. |
The bonus hashing files sit directly in src (SimpleOomage, ComplexOomage, OomageTestUtility, Hint, and a hash table visualizer) and tests (TestSimpleOomage, TestComplexOomage, plus two tiny sanity-check tests).
Lab10Graph
In this lab, you’ll be using a provided graph class called Lab10Graph.
Lab10Graph is an undirected graph whose nodes are Strings and whose edges
have int weights. It has six methods:
| Method | What it does |
|---|---|
void addNode(String s) |
Adds node s. Does nothing if s is already in the graph. |
void addEdge(String u, String v, int w) |
Adds an undirected edge between u and v with weight w. If u or v isn’t in the graph yet, it is added. |
boolean hasEdge(String u, String v) |
Returns whether there is an edge between u and v. |
int edgeWeight(String u, String v) |
Returns the weight of the edge between u and v. Throws an exception if there is no such edge. |
List<String> neighbors(String u) |
Returns the neighbors of u. |
List<String> nodes() |
Returns every node in the graph. |
In 61B, all graphs are simple, i.e. we do not allow self-edges (e.g. cow - cow) or parallel edges (two edges between cow - dog). The Lab10Graph class has the property that nodes and edges are returned by nodes and neighbors in the order added, though not all real world graph classes do this.
Part 1: Dijkstra’s Algorithm
If you completed lab 9 all the way, SKIP to “Main” and copy your code over.
Open lab10algorithms/Lab10Dijkstras.java.
public Lab10Dijkstras(Lab10Graph g, String source)
The constructor runs Dijkstra’s algorithm from source, treating every edge
weight as a distance, and stores the resulting shortest paths tree. The three
query methods then just read off the answers:
| Method | What it returns |
|---|---|
boolean hasPathTo(String v) |
Whether there is any path from the source to v. The source always has a path to itself. |
int distTo(String v) |
The total weight of the shortest path from the source to v. Throws IllegalArgumentException if there is no path. |
List<String> shortestPathTo(String v) |
The shortest path as a list of nodes, starting with the source and ending with v. For the source itself this is the one-element list [source]. Throws IllegalArgumentException if there is no path. |
We’ve provided the needed instance variables for you. The starter constructor already throws IllegalArgumentException if source is not a node of g.
The starter constructor also does step 1 of the algorithm below for you: it puts every node into the fringe with priority Integer.MAX_VALUE and sets the source’s distance and priority to 0. Your job is the rest.
The algorithm
Recall Dijkstra’s from lecture 23 (the demo is a good refresher). It keeps track of:
distTo: the best known distance from the source to each node, andedgeTo: the node we came from on that best known path.
Then:
- Set
distTo[source] = 0. Add every node to anExtrinsicMinPQwith priority equal to itsdistTo(use a large value likeInteger.MAX_VALUEfor nodes you haven’t reached yet). - While the priority queue is not empty, remove the node
uwith the smallest priority. If its distance is still “infinite”, every remaining node is unreachable and you must stop. - For each neighbor
vofu, relax the edge: ifdistTo[u] + edgeWeight(u, v)is less thandistTo[v], updatedistTo[v]andedgeTo[v], and callchangePriority(v, distTo[v]).
To answer shortestPathTo(v), walk edgeTo backwards from v to the
source, then reverse the result.
You’ll need to use the provided ExtrinsicMinPQ class described in the next section.
Only relax edges to nodes that are still in the priority queue. Once a node
has been removed, its distance is final, and calling changePriority on an
item that isn’t in the queue throws an exception. contains is available to check
if an item is in the queue.
Implement the constructor and the three query methods of Lab10Dijkstras.
ExtrinsicMinPQ
ExtrinsicMinPQ is a priority queue of Strings, where each item’s priority
is an int supplied from the outside (hence “extrinsic”). You’ll use it for
the fringe in Dijkstra’s algorithm. The methods you need:
| Method | What it does |
|---|---|
void add(String x, int priority) |
Adds x with the given priority. Throws if x is already present. |
String removeSmallest() |
Removes and returns the item with the smallest priority. |
int size() |
Returns the number of items in the queue. |
void changePriority(String x, int p) |
Changes the priority of x to p. Throws if x isn’t in the queue. |
boolean contains(String x) |
Returns whether x is in the queue. |
This project is called an extrinsicMinPQ because the priorities of an item are set extrinsically to the item. That is, the priority of a given String isn’t given by its alphabetical order or its length or anything like that, but rather the integer that is arbitrarily assigned to it.
Main
After passing the tests, to see your Dijkstra’s in action, open the Main class and run its main method. Then go to http://localhost:4567 in your web browser. In the Order dropdown, choose Lab10Dijkstras order and click Compute. The program will run your Lab10Dijkstras from the selected Start node, draw the shortest paths tree in blue, and label every reachable node with its distance. Click any node to see the shortest path to it. Visualize steps through the order in which Dijkstra’s settles the nodes.
You can select other Start nodes if you’d like.
To check off your lab, show your TA the visualizer after running Dijkstra’s from a start node of your choice: the shortest paths tree, the distances, and the path to one node you click on. The server keeps running until you stop the program, so when you’re done looking, stop Main in IntelliJ.
If you see an error about port 4567 already being in use, you probably have an earlier run of the visualizer still going. Stop it and try again.
Hashing
Everything from here on is bonus content. It is not required for checkoff, but it is good midterm 2 practice for the material from Lectures 26 and 27, and it’s short.
In this part, we’ll work to better our understanding of hash tables.
Part A: SimpleOomage
Your goal in this part of the lab will be to write an equals and
hashCode method for the SimpleOomage class, as well as tests for the
hashCode method in the TestSimpleOomage class.
To get started, open up the class SimpleOomage and take a
quick look around. A SimpleOomage has three properties: red, green, and
blue, and each may have any value that is a multiple of 5 between 0 and 255.
For example, a SimpleOomage with red=35, green=90, and blue=215 would be
valid, since all of these are multiples of 5 between 0 and 255. Try running
SimpleOomage and you’ll see four random Oomages drawn to the screen.
equals
Start by running TestSimpleOomage. You’ll see that you fail the
testEquals test. The problem is that two SimpleOomage objects are not
considered equal, even if they have the same red, green, and blue values.
This is because SimpleOomage is using the default equals method, which
simply checks to see if the ooA and ooA2 references point to the same
memory location.
Your first task for this bonus part is to write an equals method.
We’ve already done this before, e.g.
if (o instanceof SimpleOomage other) {
    // In here, "other" is o, but with type SimpleOomage,
    // so you can access other.red, other.green, and other.blue.
}
If o is not a SimpleOomage (including if it is null), the condition is
simply false. For a complete example of an equals method written this way,
see the ColoredNumber example
from Lecture 27 or the ArraySet example
from Lecture 10.
Override the equals method so that it works properly. Make sure to test your
equals method by running the test again. After fixing equals, your code should
now pass the test.
A Simple hashCode
In Java, it is critically important that if you override equals that you
also override hashCode. Uncomment the testHashCodeAndEqualsConsistency
method in TestSimpleOomage. Run it, and you’ll see that it fails. The reason
is that we’ve overridden equals but not hashCode.
To understand more deeply why this failure occurs, consider the code shown below.
Two questions to ponder when reading this code:
- What should each print statement output?
- What will each print statement output?
public void testHashCodeAndEqualsConsistency() {
    SimpleOomage ooA = new SimpleOomage(5, 10, 20);
    SimpleOomage ooA2 = new SimpleOomage(5, 10, 20);

    IO.println(ooA.equals(ooA2));

    HashSet<SimpleOomage> hashSet = new HashSet<>();
    hashSet.add(ooA);
    IO.println(hashSet.contains(ooA2));
}
Think about it before you click.
Click to reveal the answers
- The first print statement should and will output
true, according to the definition ofequalsthat we created in the previous part of the lab. - The second print statement should output
true. TheHashSetdoes contain aSimpleOomagewith r/g/b values of 5/10/20! - The second print statement will print
false(almost always). When theHashSetchecks to see ifooA2is there, it first computesooA2.hashCode(), which for our code is still the defaulthashCode(), based on the memory address. SinceooAandooA2have different addresses, their hash codes will (almost certainly) be different, so theHashSetlooks in the wrong bucket and never even callsequals. The only way it printstrueis if the two addresses happen to land in the same bucket by luck.
The Java specification for equals mentions this danger as well: “Note that it
is generally necessary to override the hashCode method whenever the equals
method is overridden, so as to maintain the general contract for the hashCode
method, which states that equal objects must have equal hash codes.”
Uncomment the given hashCode method in SimpleOomage, which will return a
hashCode equal to red + green + blue. Note that this hashCode is now
consistent with equals, so you should now pass all of the TestSimpleOomage
tests.
testHashCodePerfect
While the given hashCode method is okay, in the sense that it is consistent
with equals and thus will pass testHashCodeAndEqualsConsistency, it is only
using a tiny fraction of the possible space of hash codes, meaning it will have
many unnecessary collisions.
Our next goal for the SimpleOomage class will be to write a perfect
hashCode function. By perfect, we mean that two SimpleOomages may only have
the same hashCode if they have the exact same red, green, and blue values.
…but before we write it, fill in the testHashCodePerfect of
TestSimpleOomage with code that tests to see if the hashCode function is
perfect. Hint: Try out every possible combination of red, green, and blue
values and ensure that you never see the same value more than once. Feel free to
use any data structure you want.
Run this test and it should fail, since the provided hashCode method is not
perfect.
A Perfect hashCode
To make the hashCode perfect, set the USE_PERFECT_HASH variable to true in
SimpleOomage and in your hashCode() method, replace return 0 with a new hash
code calculation that is perfect. Finally, run TestSimpleOomage and verify
that your perfect hashCode method passes your test. Your TestSimpleOomage
test might take a few seconds to complete execution.
Evaluating the perfect hashCode in JUnit
Fill in the haveNiceHashCodeSpread(List<Oomage> oomages, int M) method in the
OomageTestUtility class so that it returns true if the given Oomages would
have a nice spread if thrown into M buckets using their hashCodes. We define a
nice spread as:
- No bucket has fewer than N / 50 oomages.
- No bucket has more than N / 2.5 oomages.
where N is the number of oomages. In other words, the number of oomages per bucket has to be within the range (N / 50, N / 2.5).
For the purposes of converting an Oomage’s hashCode to a bucket number, you
should compute bucketNum = Math.floorMod(o.hashCode(), M), where o is an
Oomage. This is the same conversion the provided visualizer uses. Note that a
hashCode can be negative, and in Java -7 % 10 is -7, not 3, so using
% directly would give you a negative bucket number. Math.floorMod always
returns a result between 0 and M - 1. See the FAQ for why we don’t use
Math.abs instead.
Fill in haveNiceHashCodeSpread in OomageTestUtility. Once you’ve written this
method, try running TestJankyOomage and it should fail. Try running
TestNiceSpreadOomage and it should pass.
Now uncomment testRandomOomagesHashCodeSpread in TestSimpleOomage and make
sure USE_PERFECT_HASH is true in your SimpleOomage class. Most likely, your
hash code will fail this test, even though it is perfect. To understand why,
let’s turn to visualization. If by some chance your hash code passes, that’s
fine, you should still use the visualizer to see how your hashCode performs
visually in the next section.
Evaluating the perfect hashCode Visually
To get a better understanding of how hash tables work, we will use a hash table
visualizer. Specifically, we’ve provided a method with the signature
visualize(List<Oomage> oomages, int M, double scale) that shows the
distribution of the given oomages across the M buckets according to their
hashcodes (and scale is a special parameter that controls the size of some
aspects of the drawing).
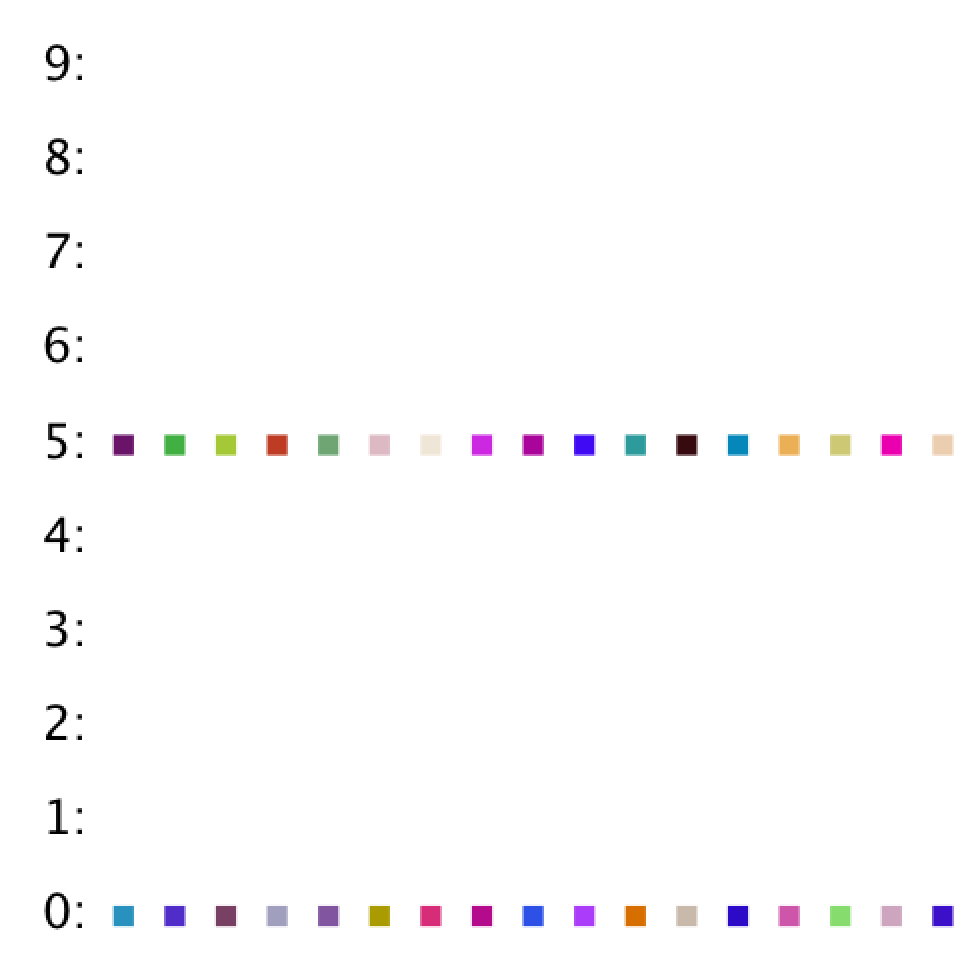
To try it out, run the HashTableVisualizer provided. Your
visualization will probably look like this (if your hash code fails the
testRandomOomagesHashCodeSpread test from the previous section):
Or if your hash code is already good enough that everything spreads out nicely, it’ll look like this:
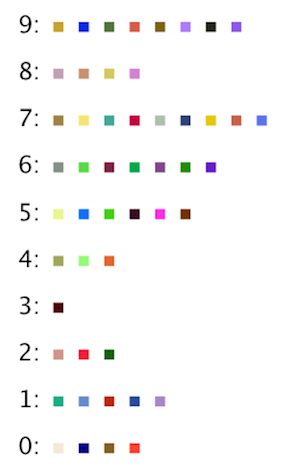
If you’re getting a figure similar to the first where everything is in two buckets,
here’s why: Even though your hashCode is perfect, it’s always returning a
multiple of 5. Try changing M to 9 in HashTableVisualizer, and you should see
a nice spread of values. Understanding why this is happening is a great idea.
If you’d like to make your hashCodes work well for any number of buckets, you should ensure that it is not always a multiple of any number. One way to do this is to divide the red, green, and blue values by 5 before computing the hash code.
Experiment With the Visualizer (Optional)
Once you’ve got a nice spread, try out the visualizer with scale = 0.5, N =
2000, M = 100.
Try messing around with N and M and see how the visualizer behaves on your
SimpleOomage class. If there isn’t enough room to fit everything on screen,
try resetting the scaling factor to a number less than one. Compare the
distribution of items for the perfect vs. imperfect vs. default hashCodes. Does
what you see match what you expect?
Part B: ComplexOomage
The ComplexOomage class is a more sophisticated beast. Instead of three
instance variables representing red, green, and blue values, each
ComplexOomage has an entire list of ints between 0 and 255 (not necessarily
multiples of 5). This list may be of any length.
This time, you won’t change the ComplexOomage class at all. Instead, your job
will be to write tests to find the flaw in the hashCode function.
Evaluating the ComplexOomage hashCode
The provided hashCode is valid, but it does a potentially bad job of
distributing items in a hash table.
Start by visualizing the spread of random ComplexOomage objects using the
visualizer. Use the randomComplexOomage method to generate random
ComplexOomages. You should find that this visual test shows no apparent
problem in the distribution of randomComplexOomages.
Also try uncommenting testRandomOomagesHashCodeSpread in TestComplexOomage.
You’ll see that it passes testRandomOomagesHashCodeSpread just fine,
reinforcing what you just saw in the visualizer. For totally random
ComplexOomages, everything is fine.
A Short Detour: How Java Stores an int
To find the flaw, it helps to know a little about how Java stores integers. We haven’t covered this in lecture, so here is the short version.
A Java int is stored as 32 bits, where each bit is a 0 or a 1. These are
the “digits” of the number written in base 2 (binary), the same way we write
numbers in base 10 with the digits 0 through 9. For example, the number 5 is
101 in binary, because 5 = 1·4 + 0·2 + 1·1. One of the 32 bits is used to record
the sign, which is why ints range from -2,147,483,648 (−2³¹) up to
2,147,483,647 (2³¹ − 1).
Two consequences of this matter for us:
- Multiplying by 256 shifts the bits. In base 10, multiplying by 100 shifts every digit two places to the left and appends two zeros. For example, 713 * 100 gives 71300. In base 2, multiplying by 256 = 2⁸ shifts every bit eight places to the left and appends eight zeros.
- Arithmetic overflows silently. If a calculation produces a result that needs
more than 32 bits, Java does not crash or warn you. It just throws away the
bits that don’t fit, keeping only the lowest 32. This is why
Integer.MAX_VALUE + 1is a large negative number, and it is also whyhashCodevalues are often negative. For example, 1000000000 * 4 in Java is -294967296 because of overflow.
Try running Hint.java, which prints the first few powers of 256 as Java
computes them. The output may surprise you. Think about what it means for the
hashCode method in ComplexOomage, which multiplies by 256 once per item in
params.
testWithDeadlyParams
In this case, we need to look at the hashCode to find the problem.
Fill in the test testWithDeadlyParams such that the provided hashCode
function fails due to poor distribution of ComplexOomage objects.
Given what we’ve learned in 61B so far, this is a really tricky problem!
Use what you learned in the detour above, and remember that Hint.java is there
to help.
Your test should not fail due to an IllegalArgumentException.
Once you’ve written this test and ComplexOomage fails it, you’re done with the
bonus part of Lab 10!
Fix the hashCode (optional)
Consider how you might change the hashCode method of ComplexOomage so that
testWithDeadlyParams passes. Are there other deadly parameters that might
strike your hashCode method?
Checkoff
As you work through the lab, check in with your TA as a group to get attendance credit. Your TA will explain how check-ins work in your section.
For your checkoff, show your TA the visualizer running your
Lab10Dijkstrasfrom a start node of your choice (seeMainabove).You do not need to have everything 100% correct to get credit. Keep working on the lab while you wait for your TA!
Deliverables
There is nothing to submit for this lab. You get credit by checking off with your TA during your lab section.
Files that you need to modify:
lab10algorithms/Lab10Dijkstras.java
Bonus (optional):
src/SimpleOomage.javasrc/OomageTestUtility.javatests/TestSimpleOomage.javatests/TestComplexOomage.java